
Choosing the right Hoshi tumbler for your toddler during the weaning stage depends on aligning the cup’s physical capacity, lid design, and overall weight with your child’s current motor skills and oral development. During this transitional phase, a cup that is too heavy can discourage independent drinking, while an inappropriate lid mechanism might hinder oral motor progression. By systematically evaluating your child’s developmental milestones and verifying the manufacturer’s specifications, you can select a model that supports self-feeding and safe hydration.
Weaning is not just about transitioning from breast milk or formula to solid foods; it is also about mastering the complex physical coordination required to drink from a cup. In the Philippines, where high humidity and warm temperatures make consistent hydration essential, having a reliable, easy-to-use tumbler is crucial for your child’s daily routine. Parents must look beyond aesthetic appeal and focus on how a specific tumbler model fits into their toddler’s hands and matches their current stage of physical coordination.
Understanding Your Toddler's Weaning Stage and Drinking Needs
At around six months, infants begin to develop the palmar grasp, using their entire hand to hold objects. As they approach their first birthday and move deeper into the toddler stage, this refines into a pincer grasp and improved bilateral coordination, allowing them to lift objects with both hands. Sipping requires a different set of oral muscles than sucking from a bottle or breast. To sip successfully, a toddler must learn to retract their tongue, seal their lips around a rim or straw, and coordinate swallowing with breathing.
Products mentioned in this guide
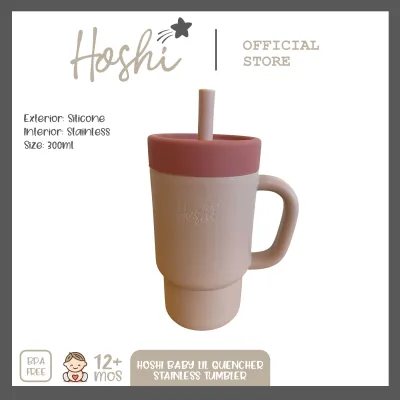
Prices are valid at publication and may change. Please refer to the product page for the latest price.
Daily fluid needs vary significantly based on age, weight, and activity level. While pediatricians generally recommend specific ranges of water intake once solid foods are introduced, parents should consult their primary healthcare provider to establish a personalized hydration plan. During weaning, water should complement, not replace, breast milk or formula. Monitoring wet diapers and overall energy levels remains the most reliable way to assess hydration status at home.
Transitioning from a spout to a straw or open cup is guided by observable behaviors. If your toddler is constantly biting down on a soft spout rather than sucking, or if they show curiosity about your own open glasses, these are strong indicators of readiness for a more advanced lid. A straw cup is often the next logical step, as it promotes oral motor strength by encouraging the tongue to rest in a mature position and strengthening the cheek muscles.
Key Features to Evaluate in Hoshi Tumblers
Spout, straw, and open-cup lids serve different developmental purposes. Spout lids, particularly soft silicone ones, offer a familiar texture that mimics a bottle nipple, making them an easy first step. However, prolonged use of hard spouts can sometimes interfere with natural tongue positioning. Straw lids require more advanced coordination but are highly recommended by pediatric speech therapists for building oral strength. Open-cup lids or 360-degree rims teach toddlers how to tilt their heads and control fluid flow without spilling, which is the ultimate goal of the weaning transition.

When browsing Hoshi tumbler options, carefully check the product labels for capacity specifications. While a larger tumbler means fewer refills during hot, humid afternoons, it also means a significantly heavier load for a toddler’s developing wrists. A full 300ml tumbler can weigh over 300 grams, which might cause a younger toddler’s hands to shake or lead to frequent drops. Balancing the physical capacity against your child’s current physical strength is key to fostering confidence.
Always verify material safety claims directly on the product packaging or the manufacturer’s official documentation. Look for explicit “BPA-free” labels and check if the materials used are food-grade silicone and high-quality plastics or stainless steel. Additionally, verify the dishwasher-safe instructions. Some tumblers are only top-rack safe, while others require complete hand-washing to preserve the integrity of their vacuum seals or printed designs.
A toddler-friendly tumbler should feature an ergonomic grip, such as contoured sides or removable dual handles, which allow small hands to secure a firm hold. Equally important is the spill-proof valve mechanism. Examine how the valve is constructed; it should prevent leaks when the tumbler is tipped upside down or dropped, yet remain easy enough for the toddler to draw liquid through without excessive effort.
Matching Tumbler Capacity to Feeding Routines
During weaning, meals and snacks are structured to introduce new textures and flavors. A typical water serving during a meal might only be 60 to 120 milliliters. Therefore, a smaller capacity tumbler is often perfectly adequate for stationary table use. Using a smaller cup during meals also keeps the high-chair tray uncluttered and reduces the mess if a spill does occur.
It is helpful to calculate the total weight of the tumbler when filled to its maximum capacity. Water weighs approximately one gram per milliliter, so adding the dry weight of the tumbler to the liquid volume gives you the total weight your child must lift. If your toddler is in the early stages of weaning, a lightweight, smaller-capacity model is highly preferable to prevent muscle fatigue and frustration.
Your choice of capacity should also reflect where the tumbler will be used. For stationary use at home, a smaller, handle-equipped tumbler is ideal. However, for outdoor trips, family visits, or travel in the warm Philippine climate, a larger, insulated model might be necessary to keep liquids cool and fresh. In these scenarios, parents usually carry the larger tumbler in a diaper bag and pour smaller amounts into the toddler’s cup as needed, or choose a model with a strap that the caregiver can carry.
Building Your Shortlist: What to Verify Before Buying
Before finalizing your purchase, cross-reference the manufacturer’s recommended age and developmental guidelines printed on the box or listed on the official product page. These guidelines are designed with safety and oral development in mind. While your child’s individual skills are the primary guide, the manufacturer’s age brackets provide a vital baseline for safety, particularly regarding small parts that could present choking hazards.
Take the time to read user reviews on reputable online marketplaces or parenting forums, focusing specifically on real-world performance. Look for feedback regarding how well the spill-proof valves hold up after multiple drops on hard tile floors. Pay close attention to comments about ease of cleaning; some models have deep crevices that are difficult to reach, which can become a breeding ground for mold in humid environments.
Confirm the current availability, exact model variations, and pricing in Philippine Pesos (₱) at authorized physical retailers or official online flagship stores. Avoid purchasing from unauthorized third-party sellers to ensure you receive a genuine product made from certified safe materials. Prices can vary based on the model’s insulation capabilities and included accessories, so comparing authorized listings helps ensure you get the best value.
A high-quality tumbler is an investment that should last through several stages of your child’s growth. Before buying, check if the manufacturer or authorized local distributors offer easily accessible replacement parts, such as extra silicone straws, spouts, and sealing rings. Toddlers frequently bite down on straws, and silicone parts naturally degrade over time with frequent washing and sterilization, making replacement parts essential for long-term, hygienic use.
Transitioning and Maintaining the Tumbler
Introducing a new tumbler should be a positive, low-pressure experience. Start by offering the cup during calm, seated meals at home, filled with a familiar liquid like breast milk, formula, or water. Avoid introducing it when your child is tired, overly hungry, or distracted. Let them explore the cup, hold the handles, and guide it to their mouth at their own pace, offering gentle assistance only when needed.
Proper hygiene is critical to prevent the growth of bacteria and mold, especially in the warm, humid climate of the Philippines. Always disassemble the tumbler completely after every use, removing all silicone valves, straws, and gaskets. Wash each part thoroughly with mild, baby-safe dishwashing liquid and warm water, using specialized small brushes to clean the inside of straws and tight crevices. Follow the manufacturer’s specific instructions regarding boiling, steam sterilization, or UV sterilization, as excessive heat can warp certain plastics and damage silicone seals.
Regular inspect all components of the tumbler for signs of wear, such as cracks in the plastic, discoloration, or tears in the silicone valves and straws. Damaged silicone can harbor bacteria and may tear further, creating a potential choking hazard. Replace any compromised parts immediately using official replacement components, adhering strictly to the brand’s safety guidelines to maintain a secure, leak-proof seal.
Frequently Asked Questions (FAQ)
When should I switch my toddler from a spout to a straw tumbler?
You should consider switching your toddler to a straw tumbler when they demonstrate improved lip sealing and can generate steady suction without biting down excessively on the drinking interface. Most toddlers show readiness for this transition between 9 and 12 months of age. Always check the manufacturer’s age recommendations on the specific Hoshi model to ensure the design matches your child’s developmental stage.
How do I clean the valves and straws to prevent mold?
To prevent mold, completely disassemble all silicone valves, straws, and lid components immediately after each use. Wash them thoroughly using warm water, baby-safe detergent, and a dedicated straw brush that can reach the entire length of the tube. Allow all parts to air-dry completely in a well-ventilated area before reassembling, and verify the manufacturer’s sterilization limits before using steam or boiling water.
What should I do if the Hoshi tumbler leaks when my toddler drops it?
If the tumbler leaks after a drop, first disassemble the lid and inspect the silicone valve and straw for micro-tears, warping, or misalignment. Often, a hard impact can dislodge the internal seal, which can be resolved by carefully reassembling the parts according to the manual. If you find a tear or if the structural seal remains compromised, consult the manufacturer’s warranty or purchase an official replacement part to restore its spill-proof function.

Community discussion
Share your experience or ask a question. Comments are reviewed before publication.