
Creating a beautiful background for baby milestone photos does not require expensive studio backdrops, professional prop kits, or high-priced photography gear. By using clean, everyday household textiles, safe toys, and natural window light, you can design a stunning, personalized setting right on your living room floor. The key is prioritizing your baby’s safety and comfort while using simple design principles like color contrast and balanced composition to make your little one the star of the frame. With a little creativity, you can capture these fleeting monthly milestones while saving thousands of pesos on professional studio sessions.
Planning Your Baby Milestone Background Theme
Before you begin gathering items, decide on a cohesive visual theme and color palette based on what you already own. A simple, uncluttered theme ensures your baby remains the focal point of the photograph. You might choose a seasonal theme, such as a bright tropical summer look using vibrant green leaves from your garden, or a cozy rainy-day setup using soft, neutral-colored blankets. Minimalist themes are also highly effective, relying on a single solid-colored sheet and a simple number marker to highlight your baby’s growth month by month.
When choosing a color palette, look for tones that complement your baby’s outfit and skin tone without overwhelming the camera sensor. Soft pastels, warm neutrals, and earthy tones work exceptionally well because they reflect light gently. Avoid highly busy patterns, such as tight stripes or loud geometric prints, which can create a distracting visual effect in digital photos. If your baby is wearing a patterned onesie, opt for a solid, neutral background; if the outfit is plain, you can introduce subtle textures in the backdrop, such as a woven cotton blanket or a traditional local banig mat.
Products mentioned in this guide
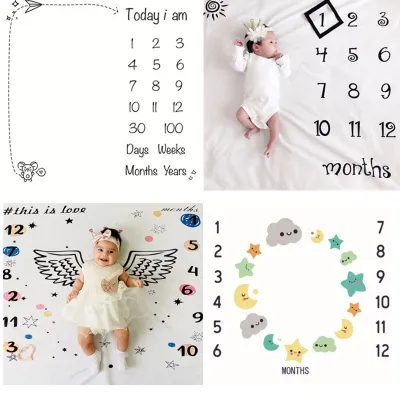
86 Lazada user ratings
Material is thin and not cotton. Better if this cloth can also serve its purpose as baby blanket but it seems for photo op only per baby's m…Read full reviewShow less
Material is thin and not cotton. Better if this cloth can also serve its purpose as baby blanket but it seems for photo op only per baby's monthly milestone
napakaganda ng quality. what you see is what you get.fair for its price.will buy again from this seller. photo not related
so cute to my daughter love it
Good quality
Great order

19 Lazada user ratings
🎧Comfort:good 🔧Material:nice 🎨Design:good Welcome to Gboard clipboard, any text you copy will be saved here.Touch and hold a clip to pin it.…Read full reviewShow less
🎧Comfort:good 🔧Material:nice 🎨Design:good Welcome to Gboard clipboard, any text you copy will be saved here.Touch and hold a clip to pin it. Unpinned clips will be deleted after 1 hour.Tap on a clip to paste it in the text box.
🎨Design:Good super love it. 🔧Material:great material 🎧Comfort:comfortable to use Ilove it , highly recommended 💯 super convenient gamitin pa…Read full reviewShow less
🎨Design:Good super love it. 🔧Material:great material 🎧Comfort:comfortable to use Ilove it , highly recommended 💯 super convenient gamitin pag monthly milestone ng mga babies 🥰
Okay naman yung quality, medyo mahal lang. Also hindi siya multicolor as seen on the pic. Color brown lahat
🎨Design: Classic Design
Prices are valid at publication and may change. Please refer to the product page for the latest price.
The physical space you select for the shoot must be flat, stable, and completely safe. A clean floor area is always the safest choice, as it eliminates any risk of the baby rolling or falling from a height. If you prefer to use a bed or a padded play mat, ensure it is firm enough that the baby does not sink into the material, which can pose a suffocation hazard. Clear away nearby furniture, sharp corners, and electrical cords before you begin setting up your backdrop.
Gathering Safe Household Materials
Repurposing everyday household textiles is an excellent way to create a soft, clean base for your photo shoot. Large cotton bedsheets, linen tablecloths, lightweight muslin swaddles, and clean bath towels can all serve as excellent backdrops. In warm, humid tropical climates, lightweight and breathable fabrics are ideal because they keep your baby cool and comfortable throughout the session. Ensure all textiles are freshly washed and ironed, as wrinkles can catch shadows and make the background look cluttered.

For props and milestone markers, look for safe, non-toxic items already present in your home. Wooden kitchen utensils like polished spoons, plush toys, clean board books, or large cardboard shapes cut from delivery boxes make excellent, baby-friendly props. If you want to add a touch of nature, fresh flowers or large, clean leaves from non-toxic household plants can add a beautiful, organic element to the frame. Always wash and dry any natural elements thoroughly before placing them near the shooting area.
Safety must guide every single material choice you make. Strictly avoid using small items that could present a choking hazard, such as loose buttons, coins, small pebbles, or tiny plastic toys. Never use heavy objects, glass frames, ceramic ornaments, or items with sharp edges that could tip over or be pulled down by an active baby. If you are using string lights or ribbons for decoration, keep them completely out of the baby’s reach to prevent any risk of entanglement. Every prop should be large enough, smooth enough, and light enough that it poses zero risk if the baby reaches out to grab it.
Step-by-Step Setup for the Photo Background
Setting up your DIY photo studio requires a systematic approach to ensure the final image looks clean, balanced, and professional. By preparing the background fully before bringing your baby into the room, you can keep the actual shooting time short and stress-free for your little one.
Step 1: Laying and smoothing the base fabric. Spread your chosen sheet or blanket over your flat surface. To prevent the fabric from bunching up or wrinkling when the baby moves, pull it taut and secure the edges. You can tuck the edges under a heavy play mat, or use painter’s tape to secure the fabric directly to a tiled or wooden floor. Ensuring a smooth, seamless base makes a massive difference in the overall quality of the photo, saving you from tedious digital editing later.
Step 2: Arranging the milestone markers and secondary props. Place your milestone indicator—such as a cardboard number, a set of soft blocks, or a decorated frame—clearly on one side of the layout. Arrange any secondary props, like a favorite stuffed animal or a small sprig of leaves, in a balanced composition. A popular layout is the “L-shape,” where props are arranged along the top and one side of the frame, leaving the opposite corner open for the baby.
Step 3: Leaving adequate negative space. It is crucial to leave a wide, empty, and comfortable zone right in the center of your setup. This negative space is where your baby will lie or sit. Keeping this area completely clear of props ensures your baby has room to stretch their arms, kick their legs, or roll over naturally without knocking into objects or accidentally putting a prop in their mouth. A cluttered center makes the photo look chaotic and increases safety risks.
Step 4: Doing a test shot. Before you place your baby on the setup, take your camera or smartphone and stand in the exact position you plan to shoot from. Take a few test photos of the empty background. Look closely at the screen: Are there any distracting wrinkles in the sheet? Is the lighting even, or are there harsh shadows cutting across the frame? Are the props arranged in a way that looks balanced? Adjust the elements now so that you are fully ready to shoot the moment your baby is placed on the mat.
Adjusting Natural Light and Camera Angles
Good lighting is the secret to professional-looking baby photos, and you do not need expensive studio lights to achieve it. Natural light is highly flattering, soft on sensitive baby eyes, and completely free. Position your photo setup near a large window or an open doorway that receives plenty of indirect sunlight. Avoid setting up in direct, harsh midday sunlight, which can cause your baby to squint, overheat, and create dark, distracting shadows on your background.
If the light coming through your window is too bright or direct, you can easily soften it using household items. Hanging a sheer white curtain, a thin white bedsheet, or even a piece of baking paper over the window pane acts as an excellent DIY diffuser. This scatters the light evenly across your setup, creating a soft, glowing effect that highlights your baby’s features beautifully. If one side of your setup is too dark, you can place a large piece of white cardboard or a white presentation board on the opposite side of the window to bounce light back onto the shadow areas.
Your camera angle will depend largely on your baby’s age and physical development. For newborns and younger infants who cannot yet sit up, a flat-lay angle is highly effective. Stand directly above the setup, holding your phone or camera parallel to the floor. To prevent any accidents, always loop your camera strap around your neck or your phone strap around your wrist before leaning over your baby. For older infants who can sit up independently, lower yourself to their eye level. Shooting from their perspective creates a more intimate, engaging portrait and captures their expressions much better than shooting from a high angle.
Safety Checks and Comfort During the Shoot
Your baby’s physical safety, health, and emotional comfort must always remain the absolute top priority during any DIY photo session. No photo, no matter how cute, is worth risking your baby’s well-being.
Before placing your baby on the setup, verify the surface temperature of the floor and the fabrics. In tropical environments, tiled floors can sometimes feel surprisingly cold, while areas near sunny windows can heat up quickly. Ensure the room is well-ventilated and kept at a comfortable temperature. If you are using an electric fan or air conditioner to keep the space cool, make sure the airflow is not blowing directly onto your baby, which can cause discomfort or chills.
Never leave your baby unattended on the photo setup, even for a single second. Even if your baby cannot roll over yet, sudden movements can happen in the blink of an eye. Always have a partner, family member, or friend act as a dedicated “spotter.” The spotter’s sole job is to stand right next to the baby, just out of the camera frame, ready to assist or gently hold the baby if they start to roll, slide, or become unsettled.
Pay close attention to your baby’s cues throughout the session. Look for early signs of fussiness, overstimulation, rubbing of the eyes, or yawning. If your baby begins to cry or show signs of fatigue, pause the shoot immediately to comfort them. If they do not settle quickly, it is best to stop the session entirely and try again another day. A happy, rested baby is much easier to photograph, and forcing a shoot will only lead to stress for both you and your little one. Finally, keep the entire shooting area free from pets, older siblings, or tripping hazards like loose cords to maintain a calm, controlled environment.
Frequently Asked Questions (FAQ)
What if my baby won't stay still on the background?
It is completely natural for babies to squirm, roll, or crawl away during a photo shoot. Instead of trying to force a static pose, adapt your photography strategy to match their natural movement. Switch your camera or smartphone to burst mode, which allows you to capture a rapid sequence of shots; this increases your chances of getting a sharp, clear image amidst the movement. You can also have a helper hold a familiar, comforting toy or make gentle sounds just behind your camera to guide your baby’s gaze toward the lens. If they continue to move, embrace the candid moments. A photo of your baby laughing while rolling off the sheet often captures their true personality far better than a perfectly still, staged pose.
How can I make milestone numbers without buying a prop set?
You can easily create beautiful, zero-cost milestone numbers using items you already have at home. One simple method is to cut large numbers out of clean cardboard boxes, smooth the edges, and wrap them in colorful fabric, wrapping paper, or safe, non-toxic colored paper. Alternatively, you can arrange everyday baby-friendly items into the shape of the number. Try laying out soft baby blocks, rolled-up colorful socks, clean wooden toys, or even fresh local fruits like small bananas or calamansi to form the number. Another modern option is to display a large, bright number on a digital tablet or smartphone screen. Secure the device safely flat on the floor, well out of your baby’s reach, ensuring there are no loose charging cables nearby.

Community discussion
Share your experience or ask a question. Comments are reviewed before publication.