
Finding the perfect replacement mallows lid for your child’s weaning cup is essential to prevent messy spills and maintain strict hygiene. When transitioning your baby to independent drinking, a secure, leak-proof seal is not just about avoiding cleanups; it is about protecting your little one from swallowing excess air or encountering bacteria trapped in loose fittings. In the tropical climate of the Philippines, where high humidity can accelerate mold growth in tiny crevices, ensuring a tight, high-quality fit is a daily priority for parents. To choose the right replacement lid, you must carefully verify the cup’s model, measure the rim compatibility, check material safety standards, and select a flow rate that matches your baby’s current developmental stage.
Identify Your Cup Model and Original Lid Design
Before searching for a replacement mallows lid, you must locate the exact model name, batch number, or manufacturing details of your weaning cup. Many baby feeding products have this information embossed or molded directly into the plastic on the base of the cup. If the text has worn off from frequent sterilizing and washing, check the original packaging or search your digital receipts from authorized online storefronts.
Next, carefully observe the attachment mechanism of the original lid. Weaning cups generally utilize screw-on threads, snap-on friction rims, or specialized flip-top hinges. Identifying this mechanism helps narrow down your search, as different models within the same brand family often use entirely different attachment styles that are not interchangeable.
Products mentioned in this guide
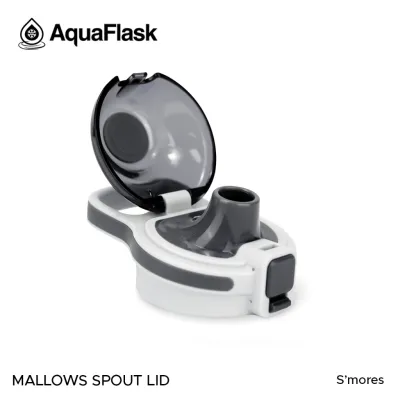
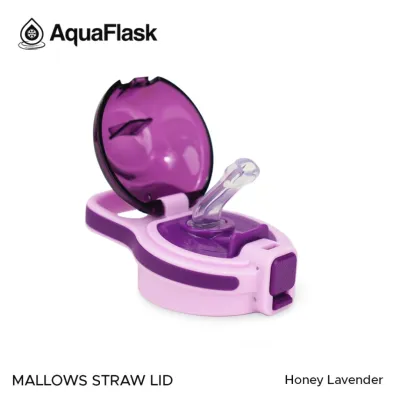
Prices are valid at publication and may change. Please refer to the product page for the latest price.
To ensure compatibility, always check the manufacturer’s official guidelines or their authorized online storefronts. These platforms typically provide detailed compatibility charts listing which replacement parts fit specific cup models. Relying on official compatibility lists is the safest way to avoid purchasing an ill-fitting part.
Never assume that visual similarity alone guarantees a secure fit. Many generic or third-party lids look identical to the authentic mallows lid in product photos, yet differ by fractions of a millimeter in thread pitch or rim thickness. For baby feeding products, even a tiny structural discrepancy can compromise the airtight seal, causing unexpected leaks or allowing the lid to pop off while your child is drinking.
Step 1: Verify Size, Rim Shape, and Thread Compatibility
If an exact manufacturer-approved replacement is unavailable, you must measure the cup’s mouth diameter and rim thickness manually. Use a precise ruler or caliper to measure the outer diameter of the cup’s mouth from one outer edge to the opposite outer edge. Additionally, note the thickness and profile of the rim, as some lids require a specific lip shape to snap down or seal correctly.

Compare the thread patterns of the cup and the replacement lid to ensure they align perfectly. Examine whether the threads are fine and closely spaced or coarse and wide, and check the positioning of any locking tabs. If the replacement lid has a different thread pitch, it will cross-thread when tightened, leaving micro-gaps that compromise the seal.
Forcing a mismatched lid onto a weaning cup can cause serious damage. The physical stress of forcing a tight fit can crack the cup’s plastic rim, strip the threads permanently, or create microscopic fractures. These micro-cracks are not only structural hazards that can pinch your baby’s fingers or lips, but they also serve as breeding grounds for bacteria and mold that are incredibly difficult to clean.
Always cross-reference the replacement product description for an explicit compatibility list rather than relying on generic size claims like “universal fit.” Reputable sellers will explicitly state which models their lids are designed to fit. If the product description is vague, contact the seller directly to verify compatibility before making a purchase.
Step 2: Check Material Safety Labels and Heat Resistance
When choosing infant feeding accessories, verifying material safety is a critical step. Look for clear, printed labels on the packaging indicating that the replacement lid is “BPA-free” and “BPS-free.” These labels help ensure that the plastics do not contain Bisphenol A or Bisphenol S, which are chemical compounds that can leach into warm liquids.
It is helpful to differentiate between the materials used in the lid’s construction. The rigid main body of a high-quality lid is typically made of food-grade polypropylene (PP), which is durable and lightweight. The flexible components, such as the sealing gaskets, straws, and spouts, should consist of 100% food-grade silicone, which is gentle on sensitive gums and provides the flexibility needed for a tight seal.
In the warm, humid climate of the Philippines, keeping infant feeding gear sterile is a top priority for parents. Before subjecting a new lid to your daily sanitizing routine, check the manufacturer’s heat resistance indicators and maximum temperature thresholds. Standard food-grade silicone and high-quality PP can typically withstand temperatures up to 100°C to 120°C, but cheaper, non-certified plastics may warp or melt in boiling water, steam sterilizers, or microwave sterilizers. Always follow the specific sterilization instructions provided by the manufacturer.
Finally, verify that the materials comply with local food safety regulations for infant products. Look for compliance declarations or certifications on the packaging to ensure the product has been tested and approved for contact with baby food and liquids.
Step 3: Choose the Right Seal Mechanism and Flow Rate
Replacement lids feature different drinking interfaces designed for specific developmental stages. Bite valves require the baby to apply gentle pressure with their gums to release liquid, making them excellent for active toddlers. Slit valves open only when the baby sucks, providing a controlled flow, while open-flow spouts allow liquid to flow freely to help older infants transition to open cups under close caregiver supervision.
Always match the flow rate of the replacement lid to your baby’s current age and physical development. A flow rate that is too fast can cause choking, coughing, or fluid entering the airway, while a flow rate that is too slow can lead to feeding frustration and fatigue. Consult your pediatrician or a pediatric feeding specialist if you are unsure about your child’s readiness for a specific flow rate.
If you frequently travel or take your baby out for family gatherings, evaluate the lid’s leak-proof mechanism for transport. Look for designs that feature internal silicone discs, locking clips, or sliding covers that fold the spout down. These secondary seals prevent messy leaks when the cup is jostled inside a diaper bag.
Keep in mind that some anti-leak valves require specific assembly, priming, or “burping” to function correctly. If you notice the spout collapsing or your baby struggling to get liquid, the valve may have a vacuum lock. Gently pinching the silicone slit valve before its first use can ensure the pre-cut opening is clear and allows air to vent properly.
Step 4: Test the Fit and Leak-Proof Seal Before Use
Before giving the assembled cup to your child, perform a thorough visual and tactile inspection. Run your fingers along the plastic edges of the new lid to check for sharp manufacturing burrs or flashing. Inspect the silicone gasket and spout for any uneven thickness, tears, or blockages that could affect performance.
Next, conduct a simple water test to verify the seal’s integrity. Wash the new lid thoroughly according to the manufacturer’s care instructions, then fill the weaning cup with room-temperature water up to the fill line. Secure the replacement lid tightly, hold the cup over a clean sink, and shake it vigorously up and down, then side to side, for at least ten seconds.
Invert the cup completely and hold it at various angles to check for leaks. Observe if any water drips from the seam where the lid meets the cup rim, or from the air vent and spout. If you notice even a slow, persistent drip, the seal is compromised and is not safe for unsupervised use or bag transport.
Establish a clear stop condition: if the lid feels loose, slips off the threads, cracks under pressure, or fails the leak test, stop using it immediately. Do not attempt to fix a faulty seal with tape, glue, or DIY gaskets, as these introduce toxic chemicals and choking hazards. Contact the seller or manufacturer for a replacement or refund.
Daily Care and Inspection to Maintain the Seal
To preserve the integrity of the seal and maintain strict hygiene, fully disassemble all removable components after every feeding session. This includes pulling out silicone straws, removing sealing rings, and detaching valve discs. In a tropical environment like the Philippines, high humidity can cause residual moisture to linger, creating an ideal breeding ground for black mold inside tiny crevices within hours.
Wash all parts with a mild, baby-safe dishwashing liquid and warm water. After rinsing, place all components on a clean, elevated drying rack in a well-ventilated area. Allow them to air-dry completely before reassembling, as storing damp cup parts promotes bacterial growth.
Avoid using abrasive brushes, toothpicks, or harsh chemicals on delicate silicone bite valves and seals. These tools can easily cause microscopic tears in the soft silicone. These tears will not only ruin the leak-proof mechanism, causing the cup to drip constantly, but they also create deep crevices where bacteria can hide.
Make it a habit to inspect the lid components weekly for signs of wear. Look for cloudiness, sticky residues, discoloration, or stretched silicone that no longer fits snugly in its channel. Replace any damaged parts immediately to ensure your baby’s feeding environment remains clean and safe.
Frequently Asked Questions (FAQ)
Can I use universal or generic replacement lids on a Mallows cup?
While some universal lids claim to fit all standard weaning cups, they rarely provide a perfect, safe fit. Universal lids often fail to match the exact thread pitch, rim curvature, or locking mechanism of proprietary cups like the Mallows weaning cup. This mismatch can lead to persistent leaks, compromised structural integrity, and hard-to-clean gaps where bacteria thrive. To ensure your baby’s safety and prevent frustrating spills, it is highly recommended to purchase manufacturer-approved replacements or lids verified specifically for your exact cup model.
How often should I replace the weaning cup lid or silicone valve?
You should always consult the manufacturer’s specific guidelines for replacement schedules. Generally, silicone valves, straws, and seals wear out much faster than the rigid plastic lid. It is critical to replace these soft components immediately if they show visible bite marks, stretching, cloudiness, or discoloration, regardless of how long they have been in use. Damaged silicone cannot maintain an airtight, leak-proof seal and can pose a choking hazard if small pieces tear off during feeding.
Community discussion
Share your experience or ask a question. Comments are reviewed before publication.